The project consists of two parts: the first part includes interfacing DS18B20 with Raspberry Pi and viewing the temperatures on the terminal and in the second part, accessing the Raspberry over the internet using Dataplicity and viewing the temperatures from a remote computer.
Overview
We have already seen about the DS18B20 Temperature Sensor in the previous tutorial. But as a reminder, I’ll mention a few important details about the sensor. DS18B20 is a Digital Temperature Sensor that communicates over 1-Wire Interface. Since Raspberry Pi doesn’t have any Analog Input Pins, choosing a Digital Sensor for implementation in projects makes it obvious.
The DS18B20 Sensor in its TO-92 package has three pins: GND, DQ (Data) and VDD. You can power the sensor either through VDD Pin or the sensor can draw power from DQ Pin (parasite power mode). For more information on the DS18B20 Temperature Sensor and how to interface it with Arduino, visit: Arduino DS18B20 Interface Tutorial
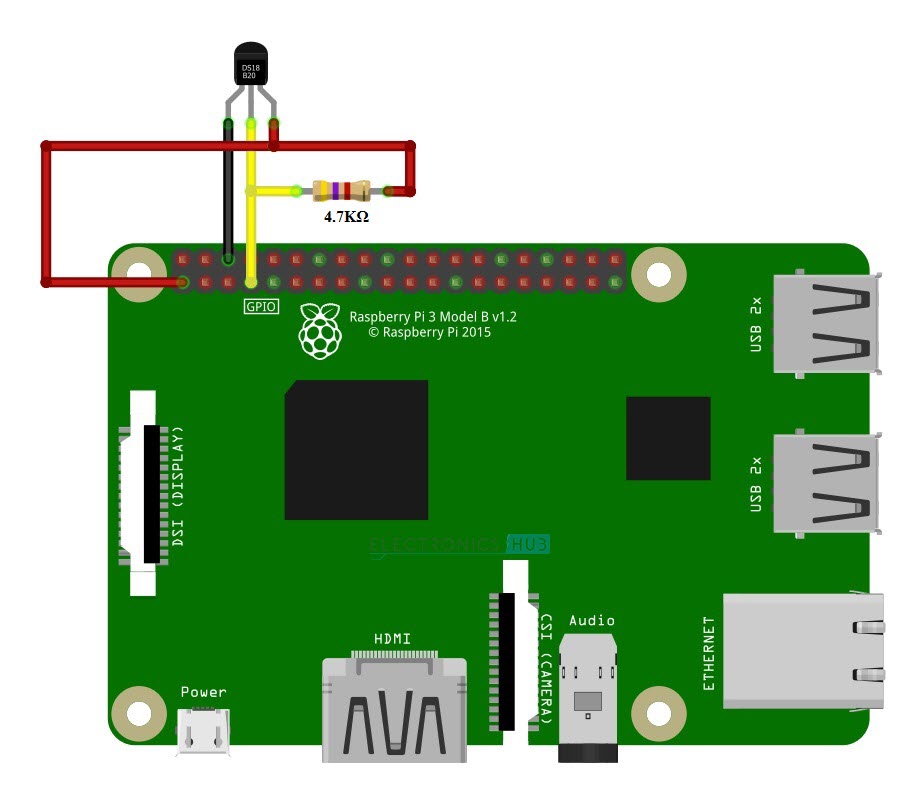
Circuit Diagram of Raspberry Pi DS18B20 Interface
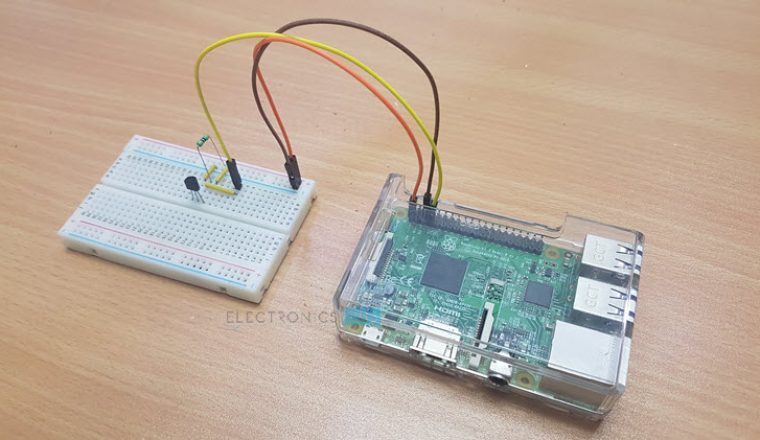
The following image shows the circuit diagram of interfacing DS18B20 Temperature Sensor with Raspberry Pi. The first image shows the connections between Raspberry Pi and DS18B20 using Fritzing Parts.
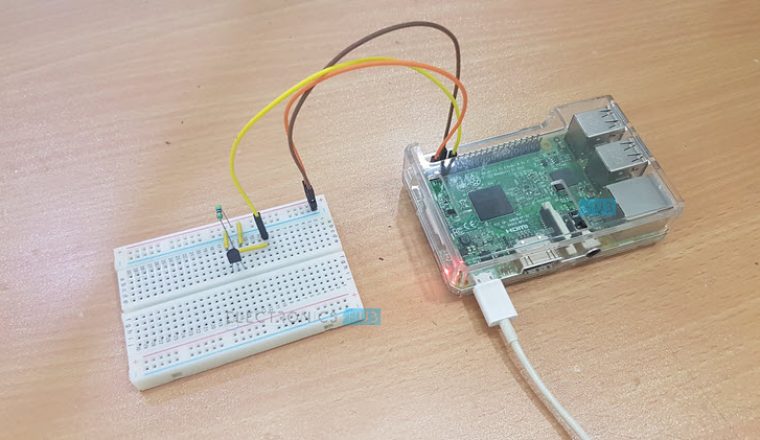
If you want a clear understanding of the connections, the following wiring diagram might be helpful.
Components Required
Raspberry Pi 3 Model B DS18B20 Digital Temperature Sensor 4.7KΩ Resistor (1/4 Watt) Breadboard Connecting Wires Micro USB Cable Computer with Internet Connectivity
Circuit Design
First, connect the VDD and GND Pins of DS18B20 Sensor to 3.3V and GND Pins of Raspberry Pi. DS18B20 can tolerate +5V Supply. Then connect a 4.7KΩ Resistor between the DQ pin of DS18B20 and 3.3V i.e. a pull-up resistor. Finally, connect the DQ Pin to GPIO4 (i.e. Physical pin 7) of Raspberry Pi.
Raspberry Pi DS18B20 Temperature Sensor Interface
We will now see how to interface DS18B20 Temperature Sensor and Raspberry Pi. Using this interface, you can develop applications like Weather Station, Remote Temperature Monitor, Temperature Data Logger etc.
Enable 1-Wire Interface in Raspberry Pi
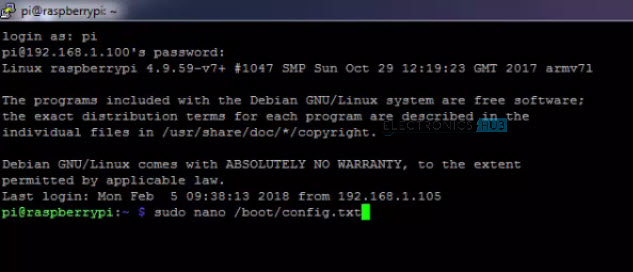
Make the connections as per the circuit diagram and power on the Raspberry Pi. Since DS18B20 Sensor communicates only on 1-Wire Interface, we need to enable the same on Raspberry Pi. So, open Raspberry Pi’s Command Prompt and open the config.txt file by entering the following command.
At the end of this file, add the following statement. Save the config.txt file by pressing Ctrl+x and then y. After saving the file, you need to reboot the Raspberry Pi. So, use the following command to reboot your Raspberry Pi.
Check whether the Sensor is Working
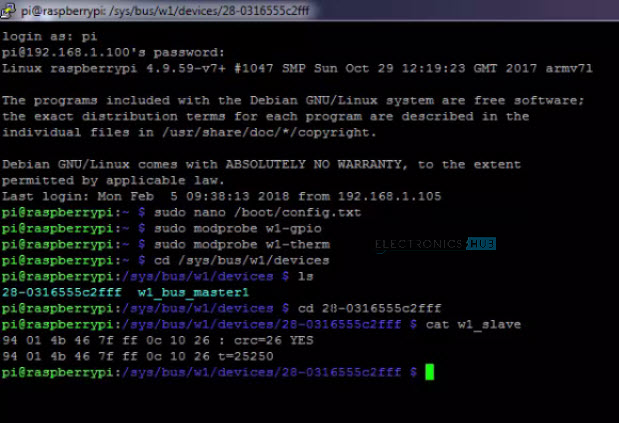
The following steps will be useful if you want to check whether your DS18B20 Temperature Sensor is working or not. You can skip this step and proceed with writing the Python Program for Raspberry Pi. After your Raspberry Pi has rebooted, login to Raspberry Pi and in the command prompt, enter the following commands. NOTE: You can also enter them in a single line by typing sudo modprobe w1-gpio && sudo modprobe w1-therm in the command prompt. Now, you need to change to the devices directory using the following command. In this directory, look for list of devices by using the ls command. In my case, the directory corresponding to DS18B20 Sensor is 28-0316555c2fff. Open this directory by using the cd command. NOTE: Replace 28-0316555c2fff with the name appeared in your directory. To view the raw temperature reading from the sensor, use the following command. If you notice, the value t=25250 at the end of the second line of the result represents the temperature as 25.25 0C.
Python Program for Reading Temperature from DS18B20
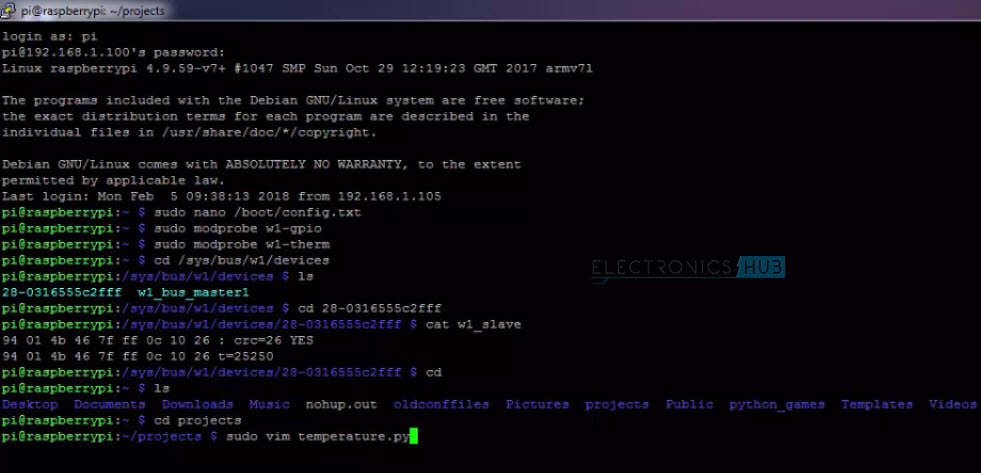
I’ve created a folder called ‘projects’ in Raspberry Pi’s Home. Change to this directory and create a new Python file with name ‘temperature.py’ using vim editor.
In this file, type the following code and save the file.
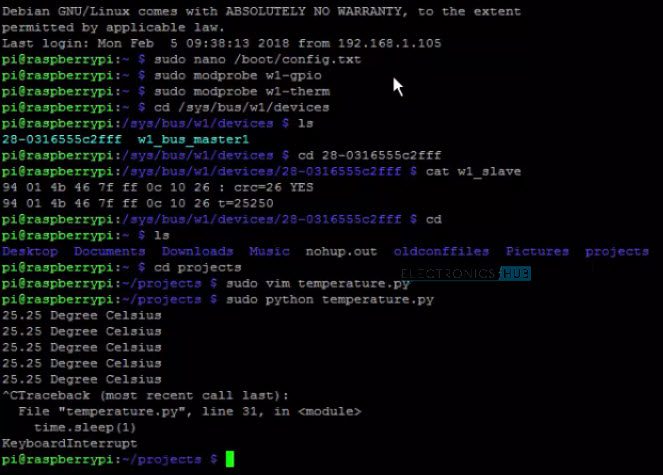
After writing or copying the code in to editor, save the file and you are ready to run the script. To run the Python Script, simply use the following command.
You will get the temperature in Degree Celsius. If you want to display the temperature in Fahrenheit, simply modify the code in the def read_temp(): section.
IoT based Temperature Monitor
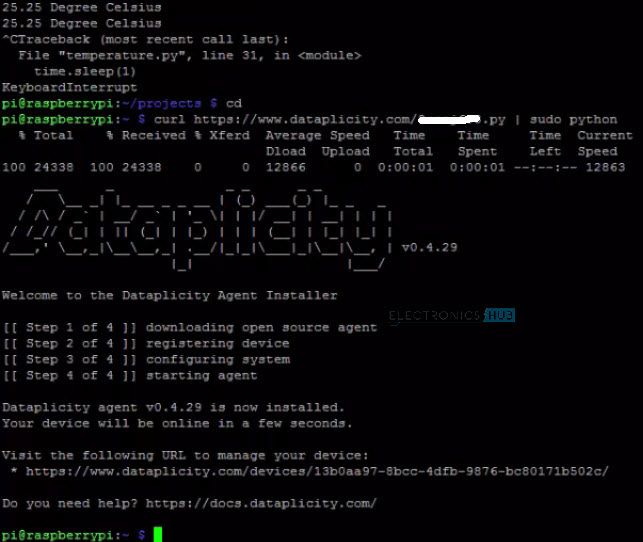
We will take the project a step ahead by setting up a Web based Monitor of Temperature. For this purpose, I’ll be using the services of Dataplicity. Go to the home page Dataplicity from the link provided. Enter your email id in the section 1 and click on Start. A Code will appear in the Section 2. Copy this code and paste it in the Command Prompt (Terminal) of the Raspberry Pi to activate the remote shell.
The code will be something like this. NOTE: ‘xxxxxxxx’ will be specific to your email id. After entering the code, it will try to download the necessary file on to your Raspberry Pi, registers your device with the Dataplicity Server, configures your system and finally runs the remote agent.
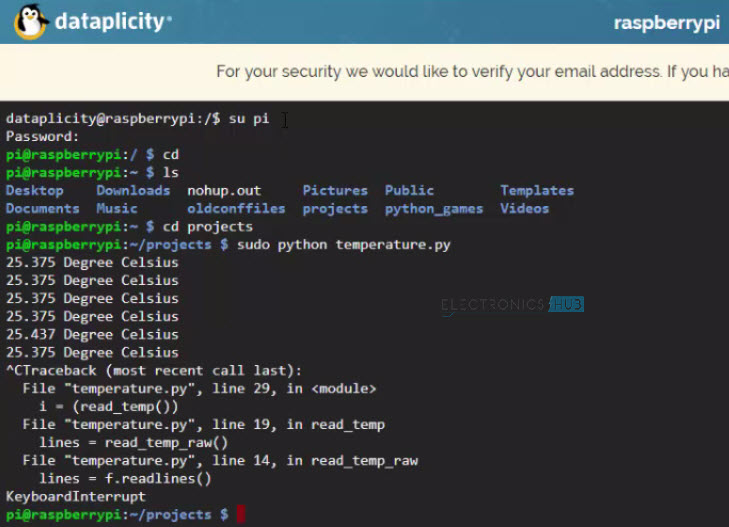
Now, click on “Done” in the Dataplicity website to begin remote access of your Raspberry Pi. The terminal will be enable and you can login using your Raspberry Pi’s credentials. As my Python Script for DS18B20 Sensor is stored in the folder ‘projects’, I’ll move to that directory and run the script using the following command.
That’s it. You have successfully completed your IoT based Temperature Monitor Application using Raspberry Pi, DS18B20 Temperature Sensor and Dataplicity. Comment * Name * Email * Website
Δ
![]()
![]()
![]()


![]()
![]()

