In fact, you may not even get past the error message to begin your regular operation. You will be forced to start your computer in Safe Mode where functionalities are very limited. Therefore, we are listing down the various methods to fix the issue and continue with your regular operation.
Methods to Fix the System Thread Exception Not Handled
1. Boot Into The Safe Mode
To break the reboot loop, you will have to boot your system in safe mode. There are many ways to boot your computer, and the most common one will be to use the sign-in screen. You can even perform it on a blank screen. On a blank screen, you can do it in the following way.
Press the power button for at least 10 seconds and make your system switch off. The next step will be to press the power button again so that your system will boot automatically. You will now see the logo of the manufacturer appear on the screen. Press the power button again and allow your device to restart. You will now land on the Windows Recovery Environment page. Then an Option screen will appear. The next step will be to go to Troubleshoot followed by Advanced Options and then Startup Settings. Click on the option of Restart. For the system reboot, you need to click on F5, which will make your system go in safe mode with networking.
To perform it through Settings,
You will have to press the Start button and select Settings.
Now you need to choose from Update & Security.
The next step will be to press on Recovery. You will now land on another page where you will come across Advanced Startup.
Select Restart now and your PC will restart. You need to go to Troubleshoot, Advanced Options, and Startup Settings.
The final step will be to press F5 before you click on Restart.
2. Finding Which One Driver is Responsible
Even a faulty driver can be responsible for the error. A malfunctioning driver can cause many errors in your computer system. The associated driver can display the network driver that can cause the BSOD. To find out which one is faulty, you will have to perform the following task.
Click on the Windows key and R simultaneously. You will come across the Run dialogue box. Next, you need to type “eventvwr” and press Ok. From there, you will come across many options where you need to select Windows logs. Click on the option of the system and check all the recent events. Try to locate the error “system_thread_exception_not_handled”. You will now come across the driver that is causing the problem.
3. Update Drivers or Rollback
If you happen to come across any faulty driver, you need to update or rollback it. By uninstalling the associated driver, you can fix the problem. It can also happen if the driver is not updated for a longer period. However, in the case, the driver has been updated, it will be better to roll back the driver or to reinstall the updates. To perform the rollback of drivers,
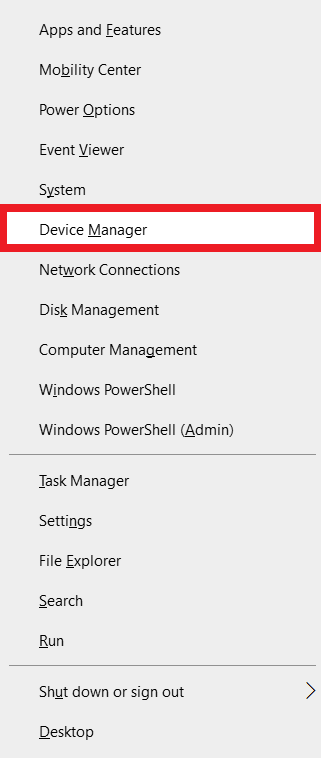
Press Windows key and R together. To open the device manager, you will have to type “devmgmt.msc” and go to the driver in question.
When you expand the menu, you will come across many options where you need to select Properties.
Following this, you will have to go Driver tab and then click Roll Back Driver.
Your system will roll back the driver automatically and it will come to the original version.
Updating of the driver can be done in the following way
Press Windows key and R simultaneously. The next step will be to type “devmgmt.msc”. You will now come across Device Manager,, which will navigate to the menu. Choose the appropriate driver and select the option of Update driver. It will highlight a dialogue box that will read “Search automatically for updated driver software“. Windows will search the web for the latest drivers and install them in your system.
4. Change The Name Of the Faulty File
Renaming the faulty file will help to deal with the error code “system_thread_exception_not_handled”. This will make sure that Windows can install or create a new copy of the driver. Keep in mind that your driver files are stored in C:\ Windows\ System32\ drivers.
The simplest way to do it will be to open File Explorer. You will now have to navigate to C:\ Windows\ System32\ drivers. Select the effective driver and click F2. Change the file name extension by giving .old at the end. Select Save the settings and restart your system.
Alternatively, you can even do it by typing “cmd” in the search option.
You will now land across cd windows\system32\drivers. Enter and rename the file name “.sys” with “.old”. Type “exit” and restart your system.
5. Use SFC & DISM to Repair The System Files
Repairing the corrupted system files helps to improve the performance of Windows. You need to run Windows repair programs DISM and SFC that are impacting the device drivers. DISM and SFC are powerful tools that can fix system-related errors. However, these commands can make changes in the system files. Even though they are simple to execute, you need to be sure that there is a system restore point. For using GSM, you will have to run the Command Prompt. (You can do it only if you are an administrator).
From there you will have to type DISM /Online /Cleanup-Image /ScanHealthand hit Enter. Windows will now scan, and you need to have patience for this. Type DISM /Online /Cleanup-image /RestoreHealth. Windows will now automatically repair the problems that occurred while scanning.
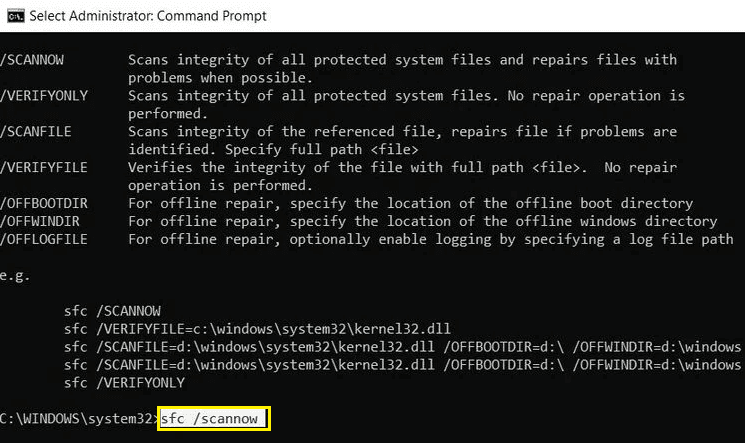
To use SFC, you will have to open the Start menu and type “cmd”. As an administrator, you need to run the command prompt.
Type sfc /scannow in the console. Windows will now scan and replace if there are any corrupt system files Another way to fix it will be to use the command prompt and type “Exe /Online /Cleanup-image /Scanhealth”. Once done, you need to type “Exe /Online /Cleanup-image /Restorehealth”.
6. Utilize System Restore For Restoring Your PC
Even after trying all the attempts, if you face the same problem, you will have to opt for a system restore. This will help to restore Windows to come to an early state. You need to restore the points periodically every time while installing new software. Another way to do it will be to set Windows to restore points daily. For system restoration, you need to follow the necessary steps.
From the Start menu bar, you will have to select the control panel.
In the control panel type Recovery and press Enter.
Now you will come across another page from where you will have to select Open System Restore.
Follow it by clicking Next and choose from the restore point list.
The final step will be to click on Finish.
The other way to restore your PC to the earlier version will be to insert a system repair disc.
Follow it by choosing your preferred language and click on the Repair option. You will come across Advanced options and Troubleshoot. Select System Restore and follow the necessary instructions.
Why does “System Thread Exception Not Handled” BSoD happen?
The Blue Screen of Death or BSoD means that your system is not able to handle something critical. It is also when Windows is crashed. You will come across the error “System thread exception not handled” due to any damage in the hardware or software. It will generate an error code and is accompanied by a stop code. This is often caused due to corrupted or incompatible drivers, hard disk’s bad sectors, and corrupted system files. You can see various errors like the following – Atikmdag.sys – This type of error occurs when the drivers are incorrectly installed or out of date. Bcmwl63a.sys – When the network Adapter is installed incorrectly or if it is outdated, then you are likely to get this problem. CMUDA.sys – When the driver is associated with USB device audio, this error will occur. Dxgmms2.sys – You will get this type of error when the DirectX drivers have any issues. Ntfs.sys – The error happens when it is associated with the Windows NT Server. Nvlddmkm.sys – If you happen to have an Nvidia-powered graphics card, you may come up with this error. It can occur when the drivers are incorrectly installed or outdated.
Conclusion
We have stated all the possible solutions to the problem of “System Thread Exception Not Handled”. You should perform every method one by one and step by step as mentioned. We hope that any of these methods will fix the issue on your computer. However, if none of them works for you, you may have to reinstall your operating system. In the worst possible scenario, you may need to contact a professional. Comment * Name * Email * Website
Δ
![]()
![]()
![]()


![]()
![]()

